...to let you know that I am taking a break from crafting for a while. I will be back at some point, but I'm not quite sure when.
Take care
Maria x
Monday 7 October 2013
Tuesday 17 September 2013
Anything Goes With Wood - Craft Room Challenge DT
Hi, firstly, my apologies for my absence of late. My partner's brother died a couple of weeks ago so it's been a very difficult fortnight, and unfortunately this will be a fairly short post as the funeral takes place tomorrow.
Over at the Craft-Room Challenge, it is time for a new theme, this time chosen by our fabulous leader (and also a very good friend) Zoe - this is what she would like to see:
Zoe says:

Over at the Craft-Room Challenge, it is time for a new theme, this time chosen by our fabulous leader (and also a very good friend) Zoe - this is what she would like to see:
Anything Goes With Wood
Zoe says:
When I saw the stand at a local craft show I had to get a selection of goodies to try, wood is a great medium to work with and this time we would like you to include something made of wood in your entry. Real wood not an image be it twigs from the garden, some bark, or a wooden embellishment from the craft shop. Anything just keep the wood as the main focus.
My creation is a very simple one using a wooden frame I bought at Port Sunlight from IndigoBlu, which I stained with Walnut Distress Stain.:

If you know me, then you will know that I love using wood and mdf - once sanded a bit, it's absolutely fantastic for stamping directly onto and beautiful treasures can be created. These frames are great for using with 3d embellishments because of the deep recess. I've stamped a SU flourish all around the edge of the frame and attached a just a TH embellishment at the top. Inside the frame, I've mounted an image by The Stampsmith, stamped onto card coloured with DI and stamped around the edge with an IndigoBlu crackle stamp and the same SU flourish as on the frame. The gorgeous lace trim is attached around the edge, which was a gift from Lynne at Adorn (thank you so much Lynne :-).
Our sponsor this fortnight is:
who is offering a fabulous prize to the winner of the random draw.
The rest of the team have made such stunning samples to inspire you, as well as our Guest Designer, Annie with her beautiful altered wooden box, so please pop over and have a look.
Have fun, I hope you can join us.
Thank you for leaving such lovely comments for me to read, I really do appreciate you taking the time to visit me, so thank you again.
Maria xxxxx
Sunday 15 September 2013
Always and Forever
Hi
Just a very short post this evening. Unfortunately I have been absent for a couple of weeks due to a family bereavement, but I hope to be back shortly.
As you know, I was thrilled to be asked to be a Guest Designer at The Stampsmith Challenge & Blog, and this is the second project I created, inspired by the song "Always & Forever" (do you remember the song?):
 A small mdf wedding keepsake which has been covered in a mixture of Kraft cardstock and co-ordinating dps by Melissa Frances.
The main image on the front cover is from the plate "Thank Heavens For Little Girls" - it has been trimmed to fit inside the bronze frame, then covered with Ice Resin.
The inside of the third page features another Stampsmith image from the "Wedding Bells" plate, which sits behind a painted and crackled chipboard frame:
 There are two pockets in the album for special mementos and a Kraft frame, which I've left open at the top, for a special personal photograph to be slipped into.
Various charms and embellishments have been added to the front page - all the pages can be seen in the photo collage below:
 There is still plenty of time to join in the challenge - just create a project (using at least one Stampsmith stamp) which has been Inspired By A Song.
I'd to say a big "hello" to my new followers, and also a huge thank you to all my regular visitors for your continued patience - it really seems to be one thing after another this year.
Maria xxxxx
Just a very short post this evening. Unfortunately I have been absent for a couple of weeks due to a family bereavement, but I hope to be back shortly.
As you know, I was thrilled to be asked to be a Guest Designer at The Stampsmith Challenge & Blog, and this is the second project I created, inspired by the song "Always & Forever" (do you remember the song?):

The main image on the front cover is from the plate "Thank Heavens For Little Girls" - it has been trimmed to fit inside the bronze frame, then covered with Ice Resin.
The inside of the third page features another Stampsmith image from the "Wedding Bells" plate, which sits behind a painted and crackled chipboard frame:

Various charms and embellishments have been added to the front page - all the pages can be seen in the photo collage below:

I'd to say a big "hello" to my new followers, and also a huge thank you to all my regular visitors for your continued patience - it really seems to be one thing after another this year.
Maria xxxxx
Sunday 1 September 2013
Inspired By A Song - The Stampsmith Challenge (GDT)
Hi, I hope you are all well and ok. Those of you who know me or who follow my blog will know that The Stampsmith Challenge is a firm favourite of mine and that I absolutely love their stamps. A little while ago, I was extremely honoured to be asked to be a Guest Designer with them for the next few months, so I would like to say a big thank you!. The theme for September is:
With all the new mdf I recently acquired, I decided to make a wall hanging, which was inspired by the song by Martina McBride "In My Daughter's Eyes" - the words to this song are beautiful and so touching, and really took me back to that overwhelming feeling I had for my daughter once she was born. She's 19 now and has made me a very proud nanna, and of course, that feeling always stays.
 This was definitely a labour of love, lol. The base was undercoated with Gesso, painted with a couple of layers of chalk paint (sanding in between), stamped with lots of words relating to Mother/Daughter, repainted, and sanded again. Around the edge, I used some Paperartsy Grunge Paste, stamped into with a CI crackle stamp, and then painted it with the same colour as the background, highlighting the raised areas with Treasure Gold in White Fire. The trim across the bottom also has pearls added and a seam binding bow.
The gorgeous Stampsmith image, from the plate "Thank Heavens For Little Girls" was stamped in Coffee Archival Ink and matted onto some music dp, then onto Kraft.

All of the rolled roses I made myself from ribbon, and just added some pearls, a couple of paper roses, and a couple of resin ones. The Tim Holtz Idealogy Hardware was also painted with chalk paint, and again, highlighted with White Fire Treasure gold (I love how this turned out) - the word 'family' (Making Memories) underneath the plate was covered with Decoart Crackle medium, and then inked to show the crackle a little more. A vintage style cameo sits amongst the roses, as does a metal heart, which was also painted with chalk paint.

The Tim Holtz glass vial contains the words to the song rolled up tightly and hangs from some chain attached to the hardware above.

'Inspired By A Song'

The gorgeous Stampsmith image, from the plate "Thank Heavens For Little Girls" was stamped in Coffee Archival Ink and matted onto some music dp, then onto Kraft.

All of the rolled roses I made myself from ribbon, and just added some pearls, a couple of paper roses, and a couple of resin ones. The Tim Holtz Idealogy Hardware was also painted with chalk paint, and again, highlighted with White Fire Treasure gold (I love how this turned out) - the word 'family' (Making Memories) underneath the plate was covered with Decoart Crackle medium, and then inked to show the crackle a little more. A vintage style cameo sits amongst the roses, as does a metal heart, which was also painted with chalk paint.

The Tim Holtz glass vial contains the words to the song rolled up tightly and hangs from some chain attached to the hardware above.

A couple of other embellishments such as a TH ticket and a sentiment bar across the top finish this off, along with a picture hook across the back to hang it from.
I hope you like it, and if you have any Stampsmith stamps, that you can join in with the challenge.
Thank you so much for your visit - I have been unable to visit recently due to a few personal problems, but I really appreciate the comments which you leave for me.
Enjoy your week.
Maria xxxxx
Tuesday 20 August 2013
A Shabby Little Birdhouse - Something New / Craft Room Challenge DT
Hi, another fortnight has 'flown' by (excuse the pun :-)) and another challenge is upon us over at the Craft Room Challenge. Your Bingo creations were amazing, I love to see how everyone interprets our challenges so differently. This fortnight the lovely Debi is our hostess and she has chosen a theme of:


I'd like to enter my little birdhouse in the following challenges:-
Altered Eclectics - Anything Goes
Country View Crafts - Quotations and Sayings
Vintage Stamping Challenge - Wings and Things
Stamping Sensations - Wings and Things and a Touch of Vintage
Our Creative Corner - Words, Words, Words
Something New
This is what Debi has to say:
For my theme I got thinking..... and if you're anything like me, you either have a heap of new stash still waiting to be used, or your Pinterest Boards are full of techniques that you want to try but just haven't got round to it yet lol. So I thought lets have a challenge that might get us using some new stash or a new technique.
Well, Debi is right - I have loads of new stuff I've not yet used, particularly alterables, so out came a brand new birdhouse which came in a little stash my other half bought me for Christmas. I thought I may as well try a new technique/product while I was at it - Grunge Paste - I seem to have a bit of a fear of texture pastes, lol, but after seeing one of Alison's fantastic creations over at Words and Pictures I thought it was time to have a go, so thank you for the inspiration Alison :-)

I've undercoated the birdhouse with Gesso all over - the Grunge Paste has been sitting on my desk begging to be used, but being avoided all the time, so out it came - I put it all over the roof with a palette knife like buttercream frosting.

Once dry I used chalk paints - a little cream sponged over brown - all over, and touched up the roof with some Treasure Gold in White Fire, then did a bit of stamping with an IndigoBlu stamp right around the base.

I applied Deco Art Crackle all over the house and waited again.....then gave it a good sand down taking some of it back off for a more distressed feel. I highlighted the crackle a little with some Walnut Stain DI.

Some TH word stickers, a bit of bark from the garden which was cleaned and inked then given the White fire treatment (couldn't find my twigs), a donut charm debossed with 'Happiness', and a couple of Tando birds painted and crackled.

A quote and stamp from Oxford Impressions' 'Birds' Nest' was used on the back, and vintage style lace trim and ribbon around the base to finish - not forgetting even more Treasure Gold White Fire on all the corners & edges.
I'm really happy with the shabby result I got on this - even though the roof does remind me a bit of a chocolate cake!
Our very kind sponsor this fornight is:
who sells a fantastic range of rubber stamps and other crafty stuff - click on the logo to visit their online store.
The rest of the Design team have made fantastic creations to inspire you for this challenge, as well as our Guest Designer this fortnight, the very talented Von from Messy Me.
I'd like to enter my little birdhouse in the following challenges:-
Altered Eclectics - Anything Goes
Country View Crafts - Quotations and Sayings
Vintage Stamping Challenge - Wings and Things
Stamping Sensations - Wings and Things and a Touch of Vintage
Our Creative Corner - Words, Words, Words
Thank you for dropping by, I appreciate your visit and your comments.
Enjoy your week :-)
Maria xxxxx
Tuesday 13 August 2013
Timeless
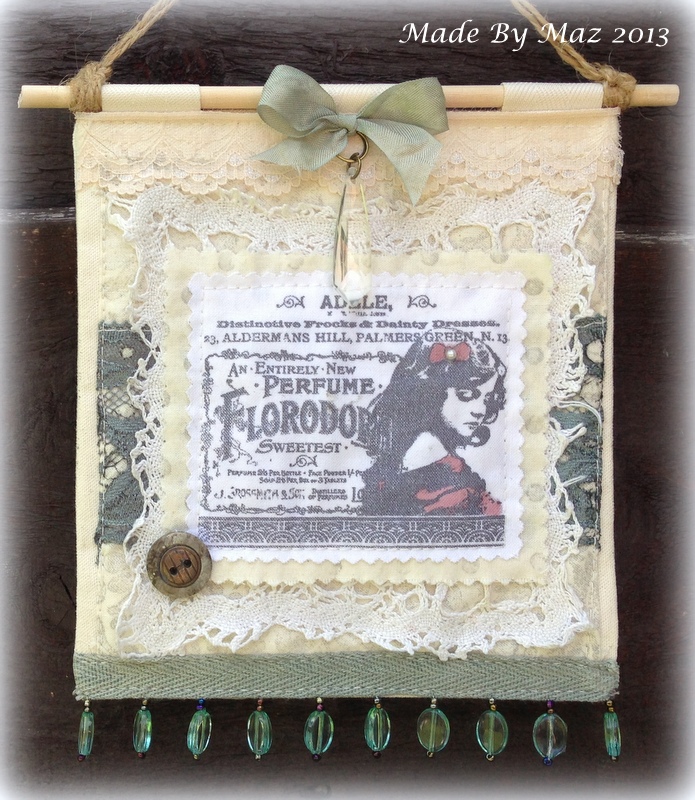
Hi, I hope you're all well. Just a short post, I'd like to share with you another mdf wall hanging, it's part of a set of three which I made to go together - the other two I will share with you another day. I've used rubber stamps from Oxford Impressions Dressforms & Corsetry plate:
 The mdf has been undercoated in Gesso then painted using cream and tan chalk paints. Some background stamping has been done with stamps from the same set and also a SU script stamp, then some sanding, and yet more painting, and more sanding.

The image has been stamped with Archival Ink and coloured with SU Watercolour Crayons, and one of Tims words added underneath the image. I've tried to keep it quite simple with clean lines, but with a bit of a shabby/vintage feel to it as well.
Some lace and trim have been added to finish, along with a button from my local market.
Enjoy your week, and thanks for dropping by.
Maria xxxxx
Tuesday 6 August 2013
"Bingo" Wall Plaque/Hanging - Craft-Room Challenge DT
Hi, wherever has the sun gone? Sadly, the rain has returned over the last few days here. Another fortnight has gone by, and it's time for a new theme at the Craft-Room Challenge. This fortnight, it's Mervi's turn to host the challenge and she would like to see us playing:


Bingo
As tempted as I was to use brown, lace and pearls, I decided to go with blue, rubber stamping and butterflies - I don't use either blue or butterflies very often so I though it would be a bit of a change for me. Having very recently acquired some left over mdf from the builders in work, who very kindly cut it into very neat, useable pieces for me :-), I decided to make a wall plaque/hanging:

An undercoat of white gesso, blue and cream chalk emulsion and a good few pieces of sandpaper created the shabby base. I'm really pleased how this turned out.
I used stamps from TH/Stampers Anonymous (the smaller size Papillon - the butterflies were masked for the background stamp) and Stampin' Up for the sentiment and foliage on the corners. All stamping was done in black archival ink and the sentiment was embossed in white. I've used a TH word stick, a paper flower and some chain to embellish, and used a dark metallic rub on wax just along the edge.

The butterflies were very lightly coloured with Stampin' Up watercolour crayons in colours from the Regals collection (I love these crayons).
Our very kind sponsor this week is
who is offering the winner a Hollyhock stencil, a pot of Stencil Dimensions Glossy White Paste, and a paste spreader.
Please drop by the challenge as the rest of the Design Team have made stunning creations for your inspiration, including our Guest Designer this month, the lovely Von of Messy Me - if you would like to join us as a Guest Designer, please add GDT after your name and our lovely Mervi will be in touch with you soon.
I'd like to share my wall hanging with Stamping Sensations in their August challenge, as their theme is Winged Things And A Touch Of Vintage, and also Tok Bobok challenge, whose theme is Vintage.
Thank you for your visit, as always, and enjoy your week.
Maria xxxxx
Tuesday 23 July 2013
Heat Embossing - Craft Room Challenge DT
Hi, I hope you're all coping well with the heat here in the UK - I daren't moan, as I really don't like winter one little bit! At the Craft-Room Challenge, we launch a new theme for the next fortnight, which has been chosen by our lovely and very talented hostess Suzanne, who would like to see:


Heat Embossing
Suzanne says:
I selected my theme based on the past couple of summers we have had here in the UK - which have been far from good. I thought we may do with a bit of "heat" although if we are at present experiencing a heatwave then the theme may prove a little unpopular as the last thing we will all want is to get those heat guns out ...whoops! However I would love to see your heat embossing on your crafty projects......
Now, I will admit to getting my challenges mixed up this fortnight, and actually made the next one instead (so you will now see that in 2 weeks!), so I had to get my skates on. This is what I made/altered:

I used a shabby chic style mdf heart which I picked up as part of a set of two from Dunelm Mill for just £1. I decided that the patterned side would be the back, and I altered the plain white side.
On the actual heart I used Versamark ink to stamp parts of the La Blanche rose around the edge, then embossed with clear ep. Colour was added with alcohol ink mixed with blending solution on my craft mat and stippled on with a stencil brush. I ironed the clear embossing back off to reveal the roses in white. It has a gorgeous, and very shabby, appearance around the edges which happened without me even trying! I'm going back to stock up on these, lol!

The SU sentiment was also stamped in Versamark onto a piece of painted chipboard, then embossed with gold ep. Metallic paste has been used on the edges of both the sentiment panel and the heart itself.
A SU brad was added to embellish, along with a seam binding bow at the top of the heart.
This fortnight we are very kindly sponsored by one of our regular sponsors:
We are also joined by our Guest Designer for July, Helene aka 2am Scrapper - please visit her blog if you haven't already done so, as her creations are fabulous.
For a little more inspiration, please pop over to the challenge to see what the other ladies have created for you - they really are beautiful makes.
I hope you enjoy the rest of your week and the beautiful weather were having, if you're in the UK.
Thank you for your visit :-)
Maria xxxxx
Sunday 14 July 2013
A bit of fabric.....
Happy Sunday! I hope you're all enjoying the sun we're having (if you're here in the UK) although it can be a bit too hot to do very much!

This was made using some left over canvas, some greenish lace across the middle, a fabric doily, and some beaded trim from Dunelm Mill (I think).
 The CI image was stamped onto a piece of white cotton, mounted onto another piece of calico, and colour added to the dress and hair bow with a copic marker - a tiny pearl was added to the centre of the bow.
The three loops at the top are made from carpet tape and inserted into the top seam before stitching, then a thin pole threaded through - it can either be hung from one hook with the twine attached, or two hooks, one for each end the thin pole.

I added a vintage style button from our local market and the seam binding bow at the top was dyed with Iced Spruce DI. The beautiful clear pendant which hangs from the bow, and the layer of lace across the top of the hanging, which sits directy underneath the bow, were gifts from a very lovely friend, Lynne from Adorn - thank you so much Lynne. Please pop over to see Lynne, if you haven't already, as she makes the most beautiful vintage creations.
My 2nd anniversary of blogging came and went a couple of months ago without me even realising (probably due to some health problems which have also impacted on my commenting, however I will explain properly at a later date) but I do intend to have a little giveaway in a few weeks time so please watch this space! It won't be huge, but I promise that it will be nice!
I would like to enter this into:
Simon Says Stamp and Show - A little Stamping
Don't forget, the theme at the Craft-Room this fortnight is Vintage Rubber Stamping, so if you can join in then please do!
Enjoy the rest of your Sunday, and the coming (sunny!) week, and thank you for your visit which I sincerely appreciate.
Maria xxxxx
I'd like to share with you a little wall hanging I made quite some time ago, however I didn't finish this until a couple of days ago, when I added some colour to the image, a button, a piece of lace across the top, and the seam binding bow and clear pendant:

The three loops at the top are made from carpet tape and inserted into the top seam before stitching, then a thin pole threaded through - it can either be hung from one hook with the twine attached, or two hooks, one for each end the thin pole.

I added a vintage style button from our local market and the seam binding bow at the top was dyed with Iced Spruce DI. The beautiful clear pendant which hangs from the bow, and the layer of lace across the top of the hanging, which sits directy underneath the bow, were gifts from a very lovely friend, Lynne from Adorn - thank you so much Lynne. Please pop over to see Lynne, if you haven't already, as she makes the most beautiful vintage creations.
My 2nd anniversary of blogging came and went a couple of months ago without me even realising (probably due to some health problems which have also impacted on my commenting, however I will explain properly at a later date) but I do intend to have a little giveaway in a few weeks time so please watch this space! It won't be huge, but I promise that it will be nice!
I would like to enter this into:
Simon Says Stamp and Show - A little Stamping
Don't forget, the theme at the Craft-Room this fortnight is Vintage Rubber Stamping, so if you can join in then please do!
Enjoy the rest of your Sunday, and the coming (sunny!) week, and thank you for your visit which I sincerely appreciate.
Maria xxxxx
Tuesday 9 July 2013
Vintage Stamping - Craft-Room Challenge DT
Hello, I hope you are all well. Oh my, the weather is HOT (here in UK)!!! It's also forecast to last the week. It's great if you're lucky enough to get out in the garden and just relax. We had some amazing entries into Zoe's "Blue & Yellow Make Green" theme over at the Craft-Room Challenge, but unfortunately, a few didn't meet the challenge criteria. I found it really inspiring to see the very different creations using just the same three colours.
This fortnight, it is my lovely friend Julia's turn to be our hostess, and she has chosen the theme of:


Thank you, as always, for dropping by and enjoy the rest of your (sunny) week.
This fortnight, it is my lovely friend Julia's turn to be our hostess, and she has chosen the theme of:
Vintage Stamping
(No Cute Creations Are Allowed This Fortnight)
I do love vintage, and decided to use an mdf frame for my creation:

After an undercoat of Gesso, I painted my frame with two different shades of chalk paint, did a bit of stamping here and there with some shabby dots and script, and applied another light coat of paint. I got a bit carried away, lol, and did a bit of sponging over the top to get a mottled effect, but this has more or less covered the background stamping. The border has a bit of dry brushing with light over darker, then a bit of Walnut Stain DI blended through with a wipe. Edged with Walnut Stain and Metallic rub-on, it gave it a lovely worn look.

The gorgeous dress was stamped onto cream card, then again onto fabric and pieced over the one stamped on the card. This stamp, by Stamps Happen, was one of the first I ever bought and I absolutely love it. There is another similar one called "Vogue" that I would really love, so I must keep an eye out for it, as they'd look great together. The other stamps are by Stampin' Up (corners, title, & shabby dots), Oxford Impressions (remaining 3 stamped panels), and Stampers Anonymous (almost invisible background script!). The edges of the main stamped panels have been smeared with Walnut Stain DI, then Colonial Metallic Rub On.

This was finished off with a couple of pieces of lace, some tissue tape, and a vintage metal flower trinket (Prima) with an Eiffel Tower charm hanging from it which was mounted onto some script-stamped muslin, and a piece of the same fabric used for the dress (Laura Ashley).
Our very kind sponsor for this fortnight is:
(click to view)
who manufacture chipboard in all sorts of shapes, sizes and themes.
Our Design Team have created the most gorgeous projects to inspire you for this fortnight's challenge, along with our Guest Designer for July, Helene aka 2amscrapper from Lotsa Scrap - please visit her blog as she is a very talented lady.
Thank you, as always, for dropping by and enjoy the rest of your (sunny) week.
Maria xxxxx
Sunday 30 June 2013
Dreaming
Hi, a very quick post this evening. I hope you've all had a lovely weekend. The Stampsmith's current June challenge is closing in a matter of hours so, after moving my craft room to yet another room, I've spent ages today trying to find my SS stamps! With most of them found, I managed to finish my entry.
Their current challenge is Boxes, Books or Bags, and their Guest Designer this month is Paula Tidman from Ephemera's Attic (who makes the most amazing bags, by the way).
I altered a notebook/journal from Ikea, which cost about £4 but, as it was nice and thick with unlined cream pages, I thought it would look nice with a facelift:

I used Melissa Franced dps for the covers and inked the edges with Vintage Photo. Beautiful Lily was stamped onto Ranger Stamping Paper with Coffee archival ink - I made the mistake of reinking this inkpad a couple of weeks ago, and discovered that it was way too wet to stamp my photo image so, after inking the stamp up, I ran a clean brayer over the top to remove some of the ink, and it turned out really well. Once dried, I used Old Paper DI over the whole image, and Vintage Photo round the edges. I roughed up the edged and tore across the bottom, then a few creases here and there to age it a little, then mounted it onto a scrap of Kraft which got the same treatment, then onto a scrap of cream muslin, and attached to the top half of the cover.
A heart shaped doily covered in Old Paper DI was glued to the bottom half of the front cover, some lace was attached to the spine with a bow in the centre and some washi tape on the back side of the spine. More lace on the top and bottom, some cork letters (edged with Walnut Stain DI) attached down the right side, and a trail of flower trim from the top around to the bottom. The TH sentiment was put in a frame and Magi-glos was added over the top and cured under a UV lamp (a last minute addition so not enough time for Ice Resin, which I would much prefer). Some burgundy flowers were added for a splash of colour and a couple of TH words here and there.
I'd like to enter this into a couple of other challenges:
It's All About The Vintage - Distress and Tear
Crafts and Me - Anything Goes
I hope you all have a great week and the weather picks up a bit. It's really windy here in Manchester this evening, and it's now pouring down with rain as well - I hate the wind, I'd rather have snow, lol!
This wasn't so short after all! Thank you for dropping by, I really do appreciate your visit.
Take care
Maria xxxxx
Tuesday 25 June 2013
Yellow and Blue Make Green - Craft-Room Challenge DT
Hello, what a busy fortnight it's been, and it's time again for a new challenge over at the Craft-Room. The entries into our Summer challenge were fabulous, I have the tough task of choosing a top 3! This fortnight's challenge theme has been chosen by our wonderful and very talented leader, Zoe, and it's a colour challenge:


Yellow and Blue make Green

We are going to be quite strict with this one, you may only use the colours Yellow, Blue & Green. If you are not using a support of those colours then it must be white, and the ink you stamp in must be either one of the three colours or black. No other colours to sneak in please.
This challenge took me out of my comfort zone completely as I don't tend to use a lot of bright colours, but I have to say, I thoroughly enjoyed getting really messy and inky, as it seems ages since I've done that! I didn't think the stamp was really my kind of thing, but I actually loved using it, so I may have to treat myself to a couple more from this range :-).
I created a wall hanging using a page from an mdf book:

I coloured an A4 sheet of Ranger matt-coated card with distress inks in Evergreen Bough, Scattered Straw, Stormy Sky, Squeezed Lemonade, and Iced Spruce. Once covered, I spritzed with water, dried, added more ink, then spritzed again, dried, etc, until I was happy with the result.
I covered the mdf page with some of the coloured card, and stamped the CI bunnies (CI-372). I then stamped them again onto a different part of the card, cut them out and attached over the top. They were stamped a third time on plain white card for the crowns, which were coloured with Scattered Straw, then I added a bit of sparkle with a Sakura clear glitter pen.

The sentiment, also coloured with Scattered Straw, is by Dylusions, and the foliage is by Indigo Blue and Hero Arts. I dyed some seam binding in the same DIs to hang this from.
Our very kind sponsor for this challenge is:
who have the most amazing selection of stamps, dies, masks and other crafty essentials.
If you would like to join us as a Guest Designer, don't forget to add "GDT" after your name when you enter, and our lovely Mervi will be in touch with you very soon.
For some more inspiration, please pop over to the Craft-Room Challenge to see the fabulous creations by the rest of the Design Team, including a gorgeous creation from our Guest Designer this fortnight, Eemeli.
Unfortunately, my time has been very limited lately. My daughter and grandson now have a little place of their own and moved out just over a week ago, so, as well as trying to help her, I have also been relocating my craft room (yet again) - each time I do this, there is more stuff to shift, lol! I will miss them very much, but I should also have a bit (or a lot!) more time!
Thank you for visiting, I really do appreciate you taking the time to drop by and comment.
Enjoy your week, whatever you are doing, and take care.
Maria xxxxx
Tuesday 11 June 2013
Here Comes Summer - Craft-Room Challenge DT
Hi, two (very lovely and sunny) weeks have flown by and it's time for a new challenge over at The Craft-Room. We loved seeing what you made with your scraps in our last challenge - isn't it amazing what gorgeous creations can be made from left over pieces! It was my turn to be the hostess this fortnight, and due to the time of the year with some of you thinking about summer holidays, and maybe even having just come back from one, I decided on the theme:
You can make whatever you want, be it a card, scrapbook layout, 3d object, altered item, in fact anything at all which makes you think of summer. The choice is yours.
Whenever I go on holiday, I can never find a beach bag the right size - I only want a small one for my bottle of suntan lotion, sunglasses, a little coin purse, some water and a couple of other bits n pieces, but they all seem to be so huge! So, as I can't find one, I decided to have a go at making my own instead:
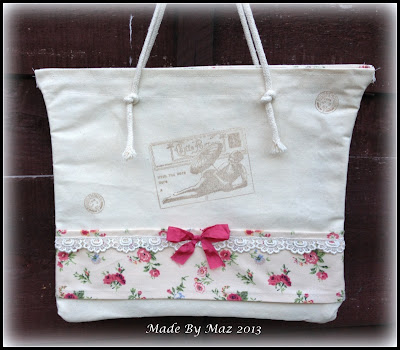
I used some thick canvas for the outside of the bag and added a trim of Laura Ashley fabric with some lace attached, and a bow made from SU seam binding. On the front of the bag I used a Crafty Individuals stamp, and also a Bournemouth postmark from a different CI set. I was unsure as to whether to use TAP for the image, or to stamp directly onto the fabric - I eventually decided to stamp straight onto the fabric as I thought the image would look nice a bit faded.
I even lined this bag in the same Laura Ashley fabric as the trim, lol:
 I used some cream broderie anglaise trim to finish the inside seams, and inserted a zip across the top - the zip didn't really go to plan but I did manage to get it in and conceal it. The straps are a thick cord which have well been stitched on so they're going nowhere!
If you fancy joining us as a Guest Designer, just add GDT after your name and our lovely Mervi will be in touch with you.

Here Comes Summer
You can make whatever you want, be it a card, scrapbook layout, 3d object, altered item, in fact anything at all which makes you think of summer. The choice is yours.
Whenever I go on holiday, I can never find a beach bag the right size - I only want a small one for my bottle of suntan lotion, sunglasses, a little coin purse, some water and a couple of other bits n pieces, but they all seem to be so huge! So, as I can't find one, I decided to have a go at making my own instead:

I even lined this bag in the same Laura Ashley fabric as the trim, lol:

If you fancy joining us as a Guest Designer, just add GDT after your name and our lovely Mervi will be in touch with you.
Our very kind sponsor this fortnight is:
Liz Welch from Rarebird:
Click on the banner to visit Liz's shop where you will find lots of Friendly Plastic
and some fantastic products and accessories to use it with.
The Design Team, along with this fortnight's Guest Designer Linda a.k.a Eemeli, have created such stunning projects to inspire you, so please do pop over and take a look.
I hope you enjoy the rest of your week, and thank you so much for dropping by - I really appreciate it.
Maria xxxxx
Saturday 1 June 2013
Some Vintage Glass Glitter........Friday Ice Linky Party
Hi, I hope you are all ok. You may remember that a little while ago I shared a bag charm with you (here), the main feature of it made using gilding flakes with Ice Resin. I'd like to show you another one I made at the same time, as a gift for a friend, but this one has been made using some Vintage Glass Glitter from SU:

The heart bronze heart shaped bezel was part filled with glass glitter which was then encased with 3 layers of Ice resin. I added a SU vintage style brad in the centre, which was also encased underneath the resin. The heart was then used as the main feature of a bag charm, which was made as a gift for Vicky over at Crafting Clare, who runs the Stampers 6 club - she is such a lovely person, who VERY patiently waited for my order month after month! Thank you Vicky :-).
Here is a picture of the full bag charm:

I'd like to link this up to the Friday Ice Linky Party over at the Vintiquities Workshop. Please pop over and take a look at the stunning cuff bracelet Thespa has created, using antique lace and, of course, Ice Resin.
I do have another, slightly different, one of these to share with you in the future - it was also made as a gift a few weeks ago, but as it was only posted today, I am unable to share it with you just yet.
Thank you for your lovely comments and best wishes - my bumps and bruises are starting to heal, although I still have a lovely one on the back of my head, and a very sore foot and hip.
Enjoy the sun this weekend, and thank you for dropping by, your visit is really appreciated.
Maria xxxxx

The heart bronze heart shaped bezel was part filled with glass glitter which was then encased with 3 layers of Ice resin. I added a SU vintage style brad in the centre, which was also encased underneath the resin. The heart was then used as the main feature of a bag charm, which was made as a gift for Vicky over at Crafting Clare, who runs the Stampers 6 club - she is such a lovely person, who VERY patiently waited for my order month after month! Thank you Vicky :-).
Here is a picture of the full bag charm:

I'd like to link this up to the Friday Ice Linky Party over at the Vintiquities Workshop. Please pop over and take a look at the stunning cuff bracelet Thespa has created, using antique lace and, of course, Ice Resin.
 |
| Click on the logo to take you there! |
Thank you for your lovely comments and best wishes - my bumps and bruises are starting to heal, although I still have a lovely one on the back of my head, and a very sore foot and hip.
Enjoy the sun this weekend, and thank you for dropping by, your visit is really appreciated.
Maria xxxxx
Thursday 30 May 2013
Use Your Scraps - Craft-Room Challenge DT
Hi, unfortunately I'm a little late with this post, due to a fall on Monday. I am ok, just a bit bruised and very sore - I'm really not having much luck lately, lol.
For the last theme, we saw your beautiful stamped backgrounds (I can tell you, it was very difficult choosing a top 3) - the new theme over at the Craft-Room Challenge has been chosen by our lovely Esther, who would like to see you:


For the last theme, we saw your beautiful stamped backgrounds (I can tell you, it was very difficult choosing a top 3) - the new theme over at the Craft-Room Challenge has been chosen by our lovely Esther, who would like to see you:
Use Your Scraps
All the papers used in my wall hanging are left over scraps from a GCD paper stack called Paris Nights, along with some scraps of lace and trim, and a bit of leftover chain. The only things that weren't left over pieces were the scissors and the metal corner:

I patched pieces of the paper onto a rectangle of left over chipboard from ages ago, and gave it a wash of diluted chalky paint. I then did a bit of stamping using stamps from the OI Dress Forms & Corsetry Plate and a flourish from SU. The TH dress form was die cut from flocked paper and a piece of beaded trim attached to the waist, and a piece of left over chain hung around the neck. The flowers were cut from the same scraps of paper using one of the smaller flowers from the TH Tattered Florals die, and then edged in Treasure Gold gilding wax in White Gold. The pieces of lace were attached, the one down the right side was also given a little White Gold treatment, as was the metal corner (top left). The scissors were then attached with hot glue, and some seam binding was used to hang.
Our sponsor for this theme is:
who are very kindly offering a £10 voucher to spend in their store
(please click on the logo to visit the shop)
If you would like to be a guest designer with us, please add GDT after your name and our wonderful Mervi will be in touch with you.
If you haven't already been over to the Craft-Room Challenge, please pop over and have a look at what wonderful creations the rest of the team have created to inspire you, including this week's fabulous guest designer, Piia.
I'd also like to enter my wall hanging into the following couple of challenges:-
Enjoy the rest of your week, and thanks for dropping by, I really appreciate it.
I'd also like to enter my wall hanging into the following couple of challenges:-
Eclectic Ellapu - Self Made (Anhydrous) Flowers
Anything But A Card Challenges - Dust Off Your Old SuppliesEnjoy the rest of your week, and thanks for dropping by, I really appreciate it.
Maria xxxxx
Wednesday 22 May 2013
Something for Friday Ice....
Hi, this is a very short post this evening. I hope you are all well and having some decent weather. I'd like to share something with you that I made a little while ago, which I'd like to enter into the current challenge over at the Friday Ice Linky Party before it closes:


I used an oval hollow backed, stop-watch style bezel:

The Ice Resin was added in layers, along with the charms and TH sticker inside, then the bird was added onto the top so that it was half inside/half outside of the final layer of resin.
This was my one of my first attempts at a hollow-backed bezels, I will share the others at a later date with you, but I quite like how this one turned out.
I hope your week is going well, and that you're looking forward to the Bank Holiday weekend.
Thanks for dropping by, it's very much appreciated.
Maria xxxxx
Monday 20 May 2013
Juliet
Hi, it's been a little while since I've posted anything other than my DT projects, or got around to visiting your blogs, so I do apologise. Unfortunately I have a sleep disorder which thankfully, due to medication, is now getting under control, so I am hoping to start a bit more active now.
I didn't get to join in with The Stampsmith Challenge last month, which I was disappointed about, but I've managed to make a little something for their current challenge "Tick Tac Toe":

At the Port Sunlight stamping fair last week, I bought a pack of metal hearts in two sizes, so I've used one of each for this. I started out by embossing twice in Stampendous Aged Ivory embossing enamel on the large heart, then ran it through my Bigshot. I then used gilding wax on the raised areas and went around the outside with a gilding pen, and added a bronze pearl at the bottom.


For the other side, I coloured with Antique Linen DI and blended a little Iced Spruce in with it. I then stamped the same flourish with a 2nd impression in Coffee Archival Ink, and embossed the SU word "Imagine" in gold ep. I then edged both sides with a gilding pen again, attached both hearts together with some chain and rings, and hung with some ribbon.

I've left the back of the large heart plain so you can see it plain, but embossed.

This is a gift for a friend, so I'm really hoping they like it, as my mojo has been lacking more than a little lately!
I'd also like to enter this into the following challenges:-
Creative Inspirations Paint - Anything Goes
Eclectic Ellapu - Anything Goes
Stamping Sensations - Embossing and Texture
Right, I'm off to do some commenting, then to make a start on visiting your blogs to see what I'm missing :-)
Enjoy your week, and thanks for your patience!
Maria xxxxx
I didn't get to join in with The Stampsmith Challenge last month, which I was disappointed about, but I've managed to make a little something for their current challenge "Tick Tac Toe":

At the Port Sunlight stamping fair last week, I bought a pack of metal hearts in two sizes, so I've used one of each for this. I started out by embossing twice in Stampendous Aged Ivory embossing enamel on the large heart, then ran it through my Bigshot. I then used gilding wax on the raised areas and went around the outside with a gilding pen, and added a bronze pearl at the bottom.

For the smaller heart, I covered both sides with some cream card. On one side, I coloured it with Iced Spruce DI then overstamped a SU flourish background with the same ink. I then attached Juliet and coloured with the Iced Spruce again, and added a little Distress Stickles, then attached a ribbon bow to the bottom.

For the other side, I coloured with Antique Linen DI and blended a little Iced Spruce in with it. I then stamped the same flourish with a 2nd impression in Coffee Archival Ink, and embossed the SU word "Imagine" in gold ep. I then edged both sides with a gilding pen again, attached both hearts together with some chain and rings, and hung with some ribbon.

I've left the back of the large heart plain so you can see it plain, but embossed.

This is a gift for a friend, so I'm really hoping they like it, as my mojo has been lacking more than a little lately!
I'd also like to enter this into the following challenges:-
Creative Inspirations Paint - Anything Goes
Eclectic Ellapu - Anything Goes
Stamping Sensations - Embossing and Texture
Right, I'm off to do some commenting, then to make a start on visiting your blogs to see what I'm missing :-)
Enjoy your week, and thanks for your patience!
Maria xxxxx
Subscribe to:
Posts (Atom)