Followers

Saturday 15 December 2012

Fabric Bookmarks

Hi, just a quick post as I know you are all busy with your Christmas preparations.  I'd like to share the first couple of a few bookmarks I've made, as little Christmas gifts:
All the stamps I've used are by Oxford Impressions Winter Snow plate, which I recent bought.  I've lightly spritzed some cream cotton fabric and stamped some images to make the background, then spritzed with a little perfect pearls in Biscotti,  The main images have been stamped onto TAP.
For a bit of rigidity (is that a proper word?), I've slipped a piece of grunge paper/board inside and stitched all the edges up, making sure I stitched through the grungeboard as well.  Some lace has been sewn on then some burgundy ric rac attached with a glue gun, and little bows attached.  A hole punched through the top and a "rivet thing" added (forgotten what they're called), through which a tassel was threaded to hang outside of the book.

I will share some the other bookmarks I've made during the week.

I'd like to enter these into some challenges, but will link up later.


Bye for now

Maria


Tuesday 11 December 2012

Make A Tag - Craft-Room Challenge

Hi, hope you are all warm and well - you can tell it's getting cold now, I couldn't get my key in the car door this morning!  Over at The Craft-Room Challenge, the "Le Chic Francais" creations from the last fortnight were beautiful, and Debi has her work cut out choosing just three!.  Anyway, It's time for a new theme, which will be open for a month this time, to take us over the Christmas period, and it's the very talented Hazel's turn to host (please check out her very gorgeous creations on her blog!).  Hazel would like to see us:
MAKE A TAG

Tags are something I don't make very often, but when I do, I really enjoy myself.  This one is quite large and was die cut on the Cricut from some Kraft cardstock:
The background of this tag is coloured with Distress Stains in Antique Brass and Aged Mahogany, and I think this will fast become one of my favourite combinations!  I love how the metallic brass and mahogany merged together when spritzed with some water, but unfortunately the camera doesn't show the full effect of this. Take my word for it, it looks really nice!!!

Once dry (and ironed!) I overstamped a Distressed Dots background in Antique Brass and a swirl around the edge (both SU) in Aged Mahogany.  The very gorgeous deep vintage pink trim was a gift from Gio (thank you Gio), and I thought it complemented this tag perfectly.  I added some deep burgundy ric rac across the top of it.  The Gibson Girl stamp is by Flonz and she has been stamped in Archival Ink and matted onto Kraft then onto some dp and some flowers were cut out of a piece of lace, with pearls to embellish.  "Adore" stamp is by Making Memories.  I've ran the distressing tool around the edge of the tag, then a little Walnut Stain DI.  Some cream and burgundy ribbon have been threaded through the top to finish.

Our challenge this month is sponsored by:

who are a stamp manufacturer based in New Zealand
and are very kindly offering a gift voucher to the winner of the random draw.

Please pop over the the Craft-Room Challenge to see the gorgeous tags made by the rest of the Design Team to inspire you!
There are a few challenges that this fits into, that I'd like to enter:

Fashionable Stamping Challenge - To Die For (my tag is die cut)
Sweet Stampin Challenge Blog - Dies and/or Punches
Crafty Ribbons Challenge - Label/Tag, Big or Small

Enjoy your week, and have a lovely, safe and very merry Christmas, from the CRC!

Maria xxxxx

Thursday 29 November 2012

Monochromatic White for Xmas

Hi, no you're not seeing things - I really has posted two creations in two days!  My blog may be a bit like the buses this week - you don't see one for ages, then they all come at once!

It's coming up to the end of the month which means that The Stampsmith November Challenge of 'Monochromatic White' (using at least one Stampsmith stamp) is nearing to a close.

As you know, I love The Stampsmith images and recently decided to take part in a couple of swaps over at The Stampsmith Group, this one in particular being a mystery swap, as no one knew who their card was coming from until it arrived.  My card went over to lovely Darlene in Canada, and it really was a mystery as I didn't even put a note in to let her know who it was from!  You will also know that I don't make very many cards so this was a bit of a challenge in itself for me:


I stamped a panel of pearl cardstock with a Christmas background stamp and some Versamark, and embossed with Wow Sparkling Snow ep. Across the top is a layer of beautiful embroidered trim, with some twinkling cotton trim lying beneath but just peeking out.  The snowflake flowers are made from the same twinkling cotton trim with some sparkly gems in the centres.  Some feather trim, gems, a small tag, and a flourish die have all been added, along with a sentiment.  Veronica Lake has been stamped onto glossy cardstock and the edges embossed with the Wow Sparkling Snow ep, then mounted onto white pearl card.  Although not shown, I also made a gift sleeve which ties with ribbon in the middle, from Kraft cardstock. 

I'm really behind on visiting your blogs at the moment, so I do apologise for that, but I will be catching up over the next couple of evenings.  Thank you for the lovely comments you've left for me.

I'd also like to enter this into the following challenges:-

Crafty Bloggers Network - Anything Goes
PanPastel UK - Frosty and Bright

Bye for now!

Maria  xxxxx


I hope you like it

Tuesday 27 November 2012

Oooh La La - Anything French - Craft-Room Challenge DT

Hi, I hope you're all well.  Hasn't the weather gone so cold!  Wow what a record number of entries we had to our last challenge over at the Craft-Room! Mervi has her work cut out choosing just three favourites, however it's now time to move onto the next theme.  This time, the very talented Debi (who does vintage so beautifully) is our hostess for the next fornight, and she has chosen the theme of:

Oooh La La 
(Anything French)

I couldn't make my mind up for what to do for this one, but in the end I opted to create a fabric wall hanging which, I kid you not, has taken me ages to make.  The intention was to create the window of a little boutique (in France, of course!):

This is made from natural untreated canvas and some Laura Ashley fabric.  The base piece was dyed a light brown then spritzed with some SU glimmer mist (this is gorgeous, and gives a lovely twinkle on fabric, in the right light!).  Various stamps were used with Coffee archival ink to create a background.  The dress forms were also stamped in archival ink and cut from canvas, glued down onto hessian and then stitched in place.  The most difficult part of this was working out in which order to put everything together, lol, as I'm definitely  no seamstress!  I attached a pole through some doubled over carpet webbing and hand sewed to the top of the hanging. I've backed this with natural canvas so that the stitching can't be seen, and strung some burlap twine to the pole from which to hang from.

I've managed to get a half decent picture now outside in the daylight, but this is much nicer in real life.

All the stamps used on this are by Oxford Impressions, from the Dress Forms and Corsetry plate, which is one of the ones that I recently treated myself to (we have to be nice to ourselves now and then!).  There are so many stamps on each plate, the possibilities with these are just endless - I love them already, and can now see why Lynne from Adorn likes them so much - she makes the most stunning creations using this range.  The inspiration for this came from a project in the OI gallery (thank you!).

Our challenge this fortnight is very kindly sponsored by:

 There will be a prize for one winner chosen by random draw!
(see challenge blog for full rules)


If you would like some inspiration, please pop over to the challenge to see the stunning creations the other DT ladies have made for you, you won't be disappointed.

I can't wait to see your french inspired creations!

Before I go, I would like to enter my wall hanging into the Rogue Redhead Designs current challenge of "Uncard", i.e. any project that is NOT a card

and also a few others:

Crafty-Embelies (#5) - Vintage/Shabby Chic
The Artistic Stamper - Anything Goes
Creative Inspirations Paint - Anything Goes
Really Reasonable Ribbon Challenge - Anything But A Card
Joanna Sheen Challenge Blog - Anything Goes Excluding Christmas

Bye for now, and enjoy your week!

Maria xxxxx

Tuesday 13 November 2012

Live, Laugh, Love - Craft Room Challenge DT

Hi, as the weeks fly by, we get closer and closer to Christmas (in fact 45 days to go!) - I haven't even started my cards yet!  It's also time for a new theme at the Craft-Room Challenge - where does the time go!  Speaking of which, your Timepiece creations were absolutely gorgeous.  This fortnight, the very talented Mervi is your hostess, and the theme she has chosen is:

Die Cuts & Punches
see below for details of our sponsor

Die Cuts and Punches are things I don't use very often at all, so it was a good excuse to brush the dust off my very under-used Cricut and have a play:

I gave the 15 x 15 wooden box frame a few coats of chalky emulsion in Pale Mortlake Cream, sanding between coats and after the final one.  The recess of the wooden frame was lined in Melissa Frances dp and the back piece was overstamped with a SU script stamp.  I've then edged with Dark Walnut Stain, and added some shabby chic ribbon to the top and bottom of the recess.  The hearts were cut out using the Cricut, two of which were stamped and the third embossed using Swiss Dots, also edged with a little Walnut Stain.  They were mounted onto slightly larger hearts cut out of Kraft cardstock, then the Kaisercraft words were mounted in the same way and attached to the hearts.  A little heart was cut out of the ribbon to embellish one corner.

I've decided to make as many Christmas gifts as possible this year, so this will be the first (apart from my calendars)!

Our sponsor this fortnight is:

Liz Welch from

who is offering one random lucky winner one of her fantastic jewellery kits!
(see blog for challenge rules)

I'm really looking forward to seeing how you use your die cuts and punches, and if you would like a little more inspiration, please head over to the Craft-Room to see what stunning creations the Design Team has made to inspire you!

Crafty Cardmakers would like to see us use 1 Or More Punches Or Die Cuts in their current challenge, so I would like to enter my box frame.

Enjoy your week!

Maria xxxxx

Tuesday 6 November 2012

Paper Tape

Hi, as promised, I'm back with my calendar entry for  Week 5 of The Craft Barn Calendar challenge.  The theme for this particular week was 'paper tape'.  I had a whole lot of fun doing this, tried a technique I'd never used before and even quite like the result!

Using Jane's technique for inspiration (she used this on Day 2 of Paper Tape week), I covered my piece of card in masking tape.  I didn't have any smooth tape, having finished a roll about two weeks ago (I wish I'd saved some now!), so I improvised and used general diy masking tape which has a bit of a texture to it.  Tearing little pieces off and layering them over my piece of card, I covered the whole piece then sprayed it with Walnut Ink Crystals dissolved in some hot water, and allowed the ink to have a good roll about all over the place, seeping into all the nooks & crannies, then I mopped up the excess.  Once it was dry, I stuck some lovely wide washi? tape across the middle of the piece of card.  The Stampers Anonymous/TH images were stamped onto Kraft cardstock with Coffee Archival Ink and then cut out, and the calender was mounted and attached.
I then used the same tape around the edges of the mdf block, bringing it around the front, then mounting the whole paper-taped piece onto the taped block.
I've backed the whole block with Kraft cardstock. I'm hoping to upload Week 4 at the weekend, along with Week 6, then I will be up to date!

I'd also like to enter this into the Eclectic Ellapu Challenge who have a theme of  It's A Vintage Thing.

Bye for now

Maria xxxxx


Monday 5 November 2012

Green, Yellow & White - Week 3 Calendar

Hi, hope you are all keeping warm - it's gone freezing now!  My car was iced up this morning, I must've blinked and missed summer!

I'm a little (ok, maybe a lot) behind with my calendars for the Craft Barn Challenge Blog.  I was on schedule on weeks 1 & 2 but then lost the plot a little - it would be so easy to throw the towel in now but I'm determined to stick with it as I'm loving doing things I've never tried before.  Still on the mdf, here is Week 3.  I did consider putting Week 5 on this post as well, but you'd probably need a flask and a packed lunch to get through it, so I've saved that one for tomorrow. 

Week 3 - Green, Yellow & White

I made a card very similar to this for my daughter's 18th birthday back in July, and because I love this image so much I've used it again here, although this has some embossing  and a bit more colour:

The stamp came from Ebay and was one of those "must haves", I'm not sure who the manufacturer is though.

The image was stamped in Archival ink then masked and the sun filled in behind her.  The sun was then masked as well and the background inked with Iced Spruce DI - I love this cool shade of green.  The TH birds and Indigo Blu bush around the edges were stamped in the same DI with some of the bushes embossed with clear embossing powder and a couple round the top embossed with holographic embossing powder.  Torn paper was used to create the hill and a Hero Arts stamp used along the bottom, then it was all edged with a touch of black.  TH tissue tape was used around the edges of the pale yellow painted piece mdf.  

A view from the side


I attached the main piece of mdf to a smaller one (with a drill & two screws!), which was painted and tissue taped in the same way, to create an L shaped piece, and attached the calendar on the bottom piece.  The sentiment is by Dylusions.


There are a couple of challenges that I'd like to enter this into:

Anything But A Card - Challenge #5
The Stamp Man - Emboss It

See you tomorrow with Week 5 (you will be forgiven for thinking that I can't count, as Week 4 will come after Week 5!)

Maria xxxxx


Tuesday 30 October 2012

Tick Tock - Craft-Room Challenge

Hi, I hope you enjoyed our Oriental theme over at the Craft-Room Challenge, your entries were gorgeous.  However, it's now time for a new theme, which the lovely Suzanne has chosen, which is:

 "Tick Tock"
we would like to see a clock or timepiece on your creation. 

For my creation, I have done the first page in a "Piggy Tales" board book which the lovely Julia gave to me.  I had never seen one of these before, the little windows slide open and closed so you can hide pictures behind.  I thought it would be lovely to use this theme to start off a sort of keepsake book for my grandson, Ethan - nursery rhymes and stories are becoming more and more frequent in our house, lol, and I had just the stamp!


I've coloured the base with Weathered Wood DI and stamped the Crafty Individuals image (CI  onto some white cardstock coloured with Antique Linen.  The footprints inside the "clock" were also stamped in weathered wood and the "tick tock"cut out of Kraft on the Cricut.  I've restamped the image a couple of times and cut some of the mice out and used them for 3, 6, and 9 on the clock - these are no ordinary mice, they're very special as some only have one ear (and some may have none!), and they all have jute tails as their original ones were chopped off (my cutting skills leave a lot to be desired lol).  Some lace has been added to finish.  When the whole book is finished, I will share it with you.

Our sponsor this fortnight is:
who stock a range of rubber stamps, masks, dies, and so much other gorgeous (and hard to resist) stuff!

(usual challenge rules apply)

Please pop over and see what stunning projects the other ladies have created for your inspiration, I hope you can join us.

Enjoy the rest of your week.

Maria xxxxx

Thursday 25 October 2012

With Gratitude

Hi, I hope you're enjoying your week.  This is a short post I'm afraid, and time is running short for me to enter The Stampsmith Challenge, with only a few days left.  The theme this month is  "With Gratitude", using at least one Stampsmith stamp on your creation.

My entry is a little wall hanger which I've made for someone as a thank you gift:


A heart-shaped piece of mdf, painted in white Gesso then covered in Viva Decor transparent Croco paste.  Once this stuff is applied, it needs to be left to crackle for about 24 hours.  This is the first time I've used it, and I love the result, it seems to self level.

A close up of the crackle
 The image I've used is Maude, and I've cut her out with a Spellbinders die, and matted onto a second die cut from Kraft cardstock, turned on it's side.  Pearls were added down the left side but I realised I didn't have enough for the other, so I used some lace instead.  A resin, glittered flower attached to the bottom, some minature roses attached onto some music paper and a shabby bow with some white chain strung behind the image and threaded through the bow, and left to hang down.  Some more shabby ribbon attached to the back to hang from.  Although not visible on the photo, Maude's lips have been tinted with a pink watercolour marker.  The back has been covered in some french vintage style dp, and edged with a gold gilding pen.

I hope you like it!

Bye for now, and I'll hopefully get my last two calendars finsished and uploaded over the weekend.

Maria xxxxxx


Tuesday 16 October 2012

Going Oriental - Craft Room Challenge DT

Hi, it's time for another challenge this fortnight over at the Craft-Room Challenge.  Your altered creations for the last theme were stunning, Julia has a very tough job choosing a top 3.  This time our lovely, and so very talented, leader Zoe has chosen the theme of:

Going Oriental

I chose to use an mdf plaque as a base for my creation, painted with black gesso and edged in a gold gilding pen:


The three Stampbord atcs were coloured with alcohol inks in Lettuce and Mountain Rose and edged in the same gilding pen as the base (these Stampbord pieces will take absolutely anything!).  The Japanese rubber stamps (unfortunately I cannot find the pack and don't remember who they're from) were stamped in black Stazon and coloured in Claybord/Stampbord inks - these are new to me and come in a pack of six, with a mixing chart for further colours.


The colours are beautifully vivid and extremely concentrated, so a little really does go a very long way.  I've added a little distress stickles here and there, a beautiful fan charm courtesy of Julia (thank you!), a couple of red jewellery beads between images, and an oriental rose (Marianne Creatables) with a dark red tassle hung from it.  To finish, I've used some dark red satin ribbon to hang.

This fortnight, we're very kindly sponsored by:


Manufacturers of unmounted rubber stamps 
and
there will be a prize for one lucky winner of the random draw!
(usual rules apply)
Please check out the other stunning DT creations for some more inspiration, and I do hope you'll join in with us.

Enjoy your week

Maria xxxxx

Saturday 13 October 2012

Style Icon

Hi, just a very quick post - after a dreadful bug and a dose of bronchitis, yesterday was probably the first day that I felt anything remotely like myself, so I decided to finish my week 2 calendar for the Craft Barn Challenge.  The theme is "Bright Colours" - not really something I use a lot of, in fact when I went to dig out my "bright colours", I couldn't actually find any, lol, apart from in my distress inks.  Now this was definitely becoming a challenge!  What I did find though, were four little pots of stencil paint, by Imagination Crafts, which I've had for over a year and never used, so this was about as bright as things were going to get.

My intentions of 12 "vintage style" calendars didn't last long, as you can see below, but I am sticking to my mdf for these (if I can).  This is my bright and colourful mdf (non-vintage) entry:


I lined my block of mdf with some SU text paper, then used the stencil paints to paint randomly everywhere, blending together as much as possible.  Lady Audrey (The Octopode Factory - I bought this in error, I thought I'd removed it from my basket, but  it turned up three months later, with an apology for the delay,as it had been out of stock!) was stamped on the same paper, but with just a wash of gesso, and cut out, and adhered with matte medium.  I added various alcohol ink coloured bits of a small time piece to her head and eye, and a piece of chain, some texture paste coloured with acrylic paint through a stencil, and some small, circular letter tiles, along with some other bits of stamping (CI & Kaisercraft), including circles done with the lids from the paint dabbers.  I edged it all with Dusty Concord DI, and lined the back in the same paper, but uncoloured, and folded the ends like gift wrap (I hope the recipient doesn't try and open it - with only a block of mdf inside they'll be a bit disappointed, lol):


Now I know this is not my best creation, but I'm happy that I've ventured out of my comfort zone and actually got something made at all with my limited supplies.  As the Craft Barn are offering 15% discount on everything in their shop when you enter the challenge (check out their rules), I might just invest in some Dylusions or Oil pastels, as I'm starting to feel a bit left out now after seeing the other gorgeous, bright and colourful entries....

I'd also like to enter this into the following challenges:

Crafts and Me - Anything Goes
Sweet Stamps - Altered Item (mdf)
PanPastel UK - Altered/Recycled Item (mdf)

Enjoy your weekend.

Maria xxxxx

Saturday 6 October 2012

Enjoy Life's Moments - Craft Barn Calendar

Hi, hope you're all enjoying your weekend.  A very short post this evening as I'm still feeling a bit under the weather - I decided during the week that I would do my best to enter the latest challenge over at the Craft Barn, and as Week 1 closes tomorrow, I had to get my skates on and finish my entry:

Click the pic to visit
It runs for 12 weeks, and you can either make a complete calendar each week or one month of your calendar per week, following the weekly theme - I've opted to make a complete calendar each week.  Week 1's theme is Vellum, not my favourite crafting material at all to be honest which is why I've not used a lot, so here's my entry:


I thought it would be nice to make some simple, free-standing, vintage style calendars for small gifts at Xmas from the larger mdf offcuts I recently acquired.- it can't be bad if I'm saving money AND recycling :-)!  Choosing a green, pink and white colour scheme, this one has been gessoed and painted with green acrylic, Melissa Frances dps were used, along with a TH on the edge die.  The lovely young girl with the kitty is a Stampsmith rubber stamp (Dave thinks she's scary, lol) and I've tinted her dress with a water-based marker - she is edged with glass glitter and matted onto white patterned vellum and embellished with a handmade ribbon rose topped with a sparkly stone..  The calender is matted onto pink vellum, and some little decorative hearts added along with some pink ric rac.

This one is about half an inch thick and quite weighty - I've used Tim Holtz Tissue Tape around the edge. 


I've finished it all off by edging the front with Inca Gold in Platinum.

Unfortunately, I had to take the photos inside as it had gone dark, so I may take them again tomorrow to show the colours better.

I'd also like to enter this into the following challenges:

Alphabet Challenge Blog - R for Recycle, Repurpose
Simon Says Stamp - Glimmer & Sparkle
Shopping Our Stash - Go Green (use green or recycle - my main colour is green and I've recycled mdf)
Crafty Bloggers Network - Anything Goes
Anything But A Card - Shiny, Sparkly, Blingy (I've used Glass Glitter around the image)
Vintage Stamping Challenge - Anything Goes


I do apologise for not getting round your blogs and commenting very quickly these days, life still seems to be manic with a baby in the house, but I would like to thank you for your continued lovely comments and for bearing with me - I really do appreciate it.  I also have a few new followers, so would like to say hello to you:-)!

Enjoy the rest of your weekend!

Maria xxxxx


Friday 5 October 2012

Precious

Hi, the weekend at last, and it's been a long week, I'm full of a cold and feeling really sorry for myself, so you'll be relieved that this is a short post, lol.  We recently had some joiners in work and when I saw them using mdf, my little eyes lit up, particularly when I saw the scraps/offcuts they were chucking to one side!  Not wanting to waste an opportunity, I asked them if I could have these and they were happy to oblige.  They kindly left them stacked up in a corner for me to collect later, and there was quite a nice little pile when I got there. All smallish pieces in different sizes, but definitely useable.

This is the first one I have had a dabble with is quite simple, measuring about 3.5 in wide x 4.5 in high:


A couple of coats of Gesso on the base then distress inks in Fired Brick, Dried Marigold and Scattered Straw.  The Art Journey image was stamped in Jet Black Stazon then, using a waterbrush, I removed as much of the colour from the image as I could to try and give the illusion of some depth, although this is more pronounced in real life.  I have embossed around the edges in Aged Gold embossing enamel and stamped "Precious" in Jet Black Stazon directly into the enamel whilst it was still molten.  This piece is just under half an inch deep so I have used TH tissue tape around the edges, touched with some Fired Brick (not visible).

Before I go, here's the first of a few pics of my grandson, who is now 9 weeks old (hasn't he grown!) - it seems that he has been doing some modelling for Tricky Little Stitches, would you believe!  Here he is showing one of Karen's little numbers off, the Little Leo hat (Karen is the sister of the very talented Marie of Baileyrosy):

Soooo cute!
I will share another with you next time :-)


I'd like to enter this into the Shopping Our Stash Challenge, whose theme is "Go Green", as I've recycled the mdf offcut, Creative Inspirations Paint as they have an "Anything Goes" theme, and a 3rd entry into the Fashionable Stamping Challenge's "Alter Something" theme.

Don't forget that the Craft-Room Challenge also have a current theme of "Alter It" at the moment.

Enjoy your weekend.

Maria xxxxx


Tuesday 2 October 2012

Alter It! Craft-Room Challenge DT

Hi, it's time again for a new theme over at the Craft-Room Challenge, and hope you enjoyed our Childhood Memories.  This fortnight, it's the lovely, and very talented, Julia's turn to choose the theme, and she has chosen:

Alter It

Now, those of you who know me will realise that this is probably my favourite type of theme - I love using bits of wood and mdf, and stuff like that.  My DT piece has actually changed three times now, lol, so I will share the first two with you at a later date.

My creation was made from one of those pieces of wood cut from a tree with the bark around still around the edge, commonly used for house plaques, something I got from Julia when she had the shop:


 I've had it for quite a while and was saving it for the right project, which I decided was to be a wedding gift:


Painted in alternating coats of white gesso and cream acrylic and sanded back, I stamped some script with Picket Fence distress stain here and there.  Just a touch of Stampendous Aged Ivory embossing enamel was added either end, along with a tiny amount of Walnut Stain DI around the edges.  A touch of Milled Lavender was added to the three large roses on the left, as purple was one of the wedding colours, then on some white muslin fabric, before attaching onto the plaque.  

To the left, I coloured some white card with Old Paper DI and stamped a Hero Arts letter script in Stazon Stone Grey then edged with Vintage Photo.

The central piece is a Stampbord ATC coloured with Old Paper DI, stamped with a SU swirl background stamp, and a piece of an old book page added.  Some SU lace was added across the top, the beautiful Stampsmith Wedding couple image was stamped on glossy card in Stazon Jet Black and mounted onto it, along with intertwined wedding rings.  I added a beaded trim (Dunelm Mill) across the bottom then attached to the plaque.  

The sentiments "Remember This Moment" and "Treasure These Memories" (Kaisercraft) were stamped in Versamark on Kraft cardstock and embossed in white, torn out, and edged with Walnut Stain DI then attached in their respective places.  A bunch of small roses was bound in lilac ribbon and attached to the right.  

I hope the happy couple like it :-)

Our theme for this fortnight is sponsored by:

 (click the image to visit their store)
who are offering a fabulous prize for the winner of our random draw!

Please pop over to the Craft-Room Challenge to see what the rest of the Design Team have created to inspire you - they are truly amazing.

The Fashionable Stamping Challenge have a current theme of Alter Something, so I would like to enter my plaque into this, and also Sweet Stampin Challenge Blog who would like to see Vintage.
Have a great fortnight!

Maria xxxxx


Thursday 27 September 2012

A Bag and A Tag!

Hi, I hope you are all well.  If you're here in the UK, the weather has been miserable with non stop rain!

This month's challenge over at The Stampsmith is Bags 'n' Tags, with only a few days left to enter.  My 'Plan A' for this challenge didn't go to plan at all (and is still 'in progress') so I opted for emergency 'Plan B' instead........Plan B was to alter a bag - the bag I used was one of the plain brown paper ones that is used for a sandwich meal deal in school (do not laugh!!!).  So, once I'd had my lunch, I kept the bag, and this is what it looks like now!!!

I stamped script (Andy Skinner) at random, then stamped some TH butterflies (Papillon), and a CI postmark,  here and there in Coffee Archival Ink.  Some SU lace was adhered along the handles, with a SU brad attached to the one on the right.  The lovely Serena (Stampsmith) was stamped in Black Stazon then tinted with Antique Linen and Vintage Photo DIs.  Some of the flowers were coloured with Claybord ink (pink/red).  The edges were distressed then it was mounted on some natural lightweight canvas, and then onto some pale pink netting.  A TH "bliss" ticket was added with a little more lace and a pink bow to finish.  I think this looks quite nice for a paper lunch bag, do you think?  They would make really nice gift bags for Xmas too!

Here's a close up of Serena:


The back was stamped, again in script and butterflies:


and I then made a tag to match:

I wanted a bit more of an aged look to the image on this, so I stamped it onto smooth cardstock with Archival Ink then added the same DIs as on the bag, and coloured only a few of the flowers in the Claybord ink.

As The Fashionable Stamping Challenge  would like to see us 'Alter Something', I'd like to enter my recycled paper lunch bag, and Live and Love Crafts would like to see 'Lovely Lace / Terrific Trims' so I'd like to enter both my bag and tag.

I hope you like them!

Bye for now

Maria xxxxx


Tuesday 25 September 2012

and the winner is.....

Hi

Just a note to let you know who the winner of my blog candy/giveaway is! 

I will be catching up with commenting later this evening, and also will be back soon with a not so little creation (and some lovely photos to share with you of a certain little person doing a bit of modelling)!

Thank you for all your suggestions for a new name for my blog - I haven't quite settled on it yet (but am working on it with your suggestions and combinations of them as well!) so watch this space for the winner of another little gift! 

Back to the blog candy, I numbered everyone's name and used random number generator to pick the winner - the person whose number it generated is.............

"The Card Man"


Please email me your address so I can post your package to you!

Bye for now

Maria xxxxx

Sunday 23 September 2012

A little blog candy...

Hi, I hope you've enjoyed your weekend.   Just to make the start of the week a little nicer, I have a small blog candy/giveaway. There are two reasons for this:  firstly by way of an apology for not visiting as much as I'd like at the moment, partly due to our recent house move (we're still unpacking 2 months on - when will it end!) and also the birth of my grandson - life seems to be absolutely manic now and I'm having serious crafty withdrawl symptoms, lol.  Secondly, I think it's time for a bit of a blog facelift - and that's where you come in!

I've been blogging for over a year now and would dearly like to give my blog a complete overhaul - a new look and maybe a new name.  I've got a couple of names in mind but would love some more suggestions, if you can think of any?

This is my little parcel, it's not a lot but you could make some nice things with them - there are a couple of things to alter (one of those famous Ikea mirrors, and a slide mailer), 5 x 1m lengths of lovely lace/trim, 2 x CI stamps, 1 x Marianne Creatable ribbon die/embossing thingy, 4 small Stampbord pieces, and a few brass charms and a couple of other things.....


I'll draw the winner by randon number, so if you'd like to enter, please leave a comment below, make sure you're a follower, and, if you don't mind, I'd be eternally grateful if you would pop a pic in your sidebar or somewhere.  It will run until midnight on Sunday 23rd September, which is two weeks away. I'll also add this in the Blog Candy Cauldron (thank you Joanna).

There will also be a second surprise gift for someone who can come up with a better name for my blog than the ones I've thought of: :-)!!!

Bye for now...

Maria xxxxx


Tuesday 18 September 2012

Childhood Memories - Craft-Room DT

Hiya, over at the Craft-Room Challenge, the last fortnight has flown by and we've seen some fabulous Collage creations, however it's now time for a new theme and it's my turn to choose!  For the next fortnight we would like to see a creation inspired by:

Childhood Memories
 using rubber stamps, photos, etc, 
(but no digi stamps for this fortnight please)

We have a great prize from our sponsor for this challenge (see below) which will be chosen by random draw, and as per usual, there will be a top 3.  Full rules for the challenge can be found here.

I've chosen this theme because I've often bought stamps in the past that have reminded me of a time in my childhood, and then made or altered something which has turned out to be quite special or sentimental - and enjoyed that little trip back into my childhood at the same time!

This is what I have created:

 My mum is from Southern Ireland and each year, we went to stay with my Nanna for our summer holidays.  She lived in a little village with twice as many little pubs as streets, and the beach at the bottom of the front garden (my sister and I spent many a day either on the beach and paddling in the sea, or climbing over the rocks to reach the harbour).  My Nanna was a very small and gentle lady, and with a beautiful voice, she always got up to sing an Irish song in the pub.

So, when I spotted this Chapel Road Artstamps - Whistle Boy - at Port Sunlight last May, I had to buy it.  I've stamped the main image (and The Blarney Pilgrim) in Stazon Stone Grey and lightly coloured with Inktense, and the Tando bird has been coloured with Rub n Buff (Old Gold).  The Tando Mini Theatre Stage (from Crafty Individuals) has had a couple of coats of Gesso then various shades of green Distress Ink added (along with lots of water sprayed and flicked) and some green Perfect Pearls - they used to say no two shades of green are the same in Ireland.  I've done a bit of background stamping using more green Distress Inks, using script (SU) and crackle (CI) stamps.  The little TH bottle is filled with some fine gold stuff, the nearest I could find resembling sand - if I could've bottled the gorgeous smell from the sea when you opened my Nanna's front door, I would have!  Slainte is embossed in gold (and means "(good) health", and is used as a drinking toast).  I've edged the whole thing in more Rub n Buff to finish and added some little roses. 

Our fabulous sponsor for this challenge is:

 who are offering a great prize - thank you!

I hope you find the time to join us, and look forward to seeing your Childhood Memories creations, and hearing what's inspired them.  For more inspiration, please check out the fantastic creations by the rest of the DT.

I hope you like my little memory piece (and that you're still awake, lol!).

Enjoy your week!

Maria xxxxx

p.s. Don't forget, I have a little blog candy here!


Tuesday 4 September 2012

Collage - Craft-Room Challenge DT

Hi, it's time for a new challenge over at the Craft-Room, we loved seeing what you created using your Charms & Pins during the last fortnight.  For this challenge, it was Esther's turn to choose the theme (check out her fantastic creations on her blog!), and she has chosen :

Collage

A fantastic prize for one lucky person, picked at random, is up for grabs- see below for full details, and also the Craft-Room Challenge blog.

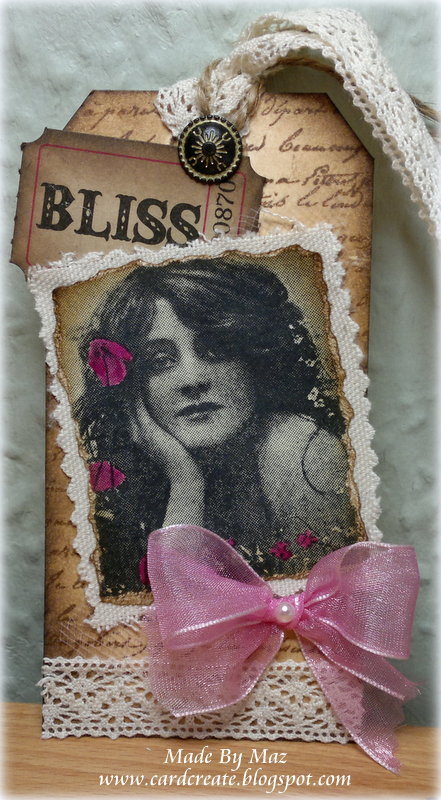
Now, this theme really stumped me, I have to say, as collage is not something I generally do (and neither are canvases for that matter!).  After much consideration (and then some more!), I opted to try a sort of napkin collage on canvas, and this is the result:

The canvas was gessoed a couple of times then painted with Docrafts Acrylic paint in Linen.  I adhered a couple of torn pieces of a print of very old official letter to the canvas then started with the napkin:  the one I used was a floral one I picked up in Ikea - it has beautiful big pinky red flowers.  I split the napkin into layers and carefully tore round the edge of a couple of the flowers.  I applied Multi Matte Medium to the back of the flowers then carefully laid them over the letter pieces on the canvas, going over them again with the MMM.  I then made a wash with Gesso and water and painted this over the canvas to fade the text and flowers a little.  On the plain unprinted layers of the napkin, I stamped all of the images (except the corset advertisement) & sentiment and adhered them in the same way as the napkin flowers.  I then added a touch of Stampendous Aged Ivory Embossing Enamel (I love this!) around the edges of the canvas and underneath the sentiment, some pale pink ric rac around the edge of the canvas with fabric glue, and some handmade ribbon roses (if you're wondering why all my handmade flowers are this style, it's because they are the only flowers I can make, lol!) on top of the embossing enamel, underneath the sentiment.

For the corset advertisement I used some SU text dp and brushed with a little gesso.  Once dry, I stamped the image and added some colour to it with Inktense pencils, then backed it with black cardstock to make it a little more rigid.  I then attached it to the canvas using sticky pads.  A metal scissor charm was added, to finish it off.

There are some fabulous napkin creations around, but I was really inspired by Joanna from Under A Creative Spell - she gets the most amazing results using napkins, so thank you Joanna!

All stamps used are by Indigo Blu:  from the "Sewing Mends the Soul" plate, & Harlequin stamp.

This fortnight, we are sponsored by:

(click the banner to visit their online store)

who are offering this fantastic FlitterGlu prize to one lucky random winner:

I hope you'll join in with us, and if you would like some inspiration for this challenge, pop over to the Craft-Room and check out the fantastic creations by the rest of the team - they're fabulous!

I'd like to enter my collage canvas into the following challenges:

Anything But A Card - Always Anything But A Card (use a stamp)
Ladybug Crafts - Anything Goes
Anything But A Card - Anything Goes
The Fashionable Stamping Challenge - Anything Floral/Handmade Flowers
Enjoy your week!

Maria xxxxx

Friday 31 August 2012

Little Lavender Pillow

Hi, it's the weekend!!!  I always think that Friday is the best night of the week as we have the whole of weekend to look forward to :-).

I'd like to share a couple of simple lavender pillows with you which I've made - I bought a big bag of dried lavender flowers about a month ago with the intention of making some pillows, but only got around to making a start on them last week, however there are more in the making as we speak (to be shared at a later date!)!

These remind me of what my Nanna and Grandma used to have in their drawers/wardrobe years ago!  For both of these pillows, I've recycled some left over good quality curtain lining - I've stamped the Stampendous image and the TH background (Papillion) with Versacraft Ink (this becomes permanent once heat set with an iron) and added a glittery white lace trim.  The pillow was then sewn together apart from a little part of the seam, filled with lavender then stitched up completely.  I've attached a little bow and a charm for decoration.  The flowers on the image have been lightly tinted with an Inktense pencil, although I don't think this is very visible from the photo.  I really wish you could smell this as it smells so beautiful!

I'd like to enter my creation into The Fashionable Stamping Challenge, as they have a theme of Anything Floral or Handmade Flowers at the moment.

Here's a little mini one that I made with an offcut of fabric:

This mini pillow has also been stamped in Versacraft Ink and tinted with Inktense pencils, but a little tab made from seam binding has been added to the top right corner so that it can be slipped over a clothes hanger.

Other challenges I'd like to enter are:

Everybody Art - Anything Goes
Stamp and Create - Stitch It Up
That Craft Place - Vintage

I hope you enjoy your weekend!

Maria xxxxx

Tuesday 28 August 2012

More Classy & Fabulous

Hi, I hope you've all enjoyed your bank holiday weekend, despite the wet weather!  I've finally managed to get some crafting time over the weekend (miraculously!), as my other half and my daughter were both out most of Sunday - there were sparks coming off the soles of my shoes running up the stairs to my craft room!  I've made a few things which I will share over the next couple of weeks.

The first of these is for The Stampsmith Challenge - I missed the last challenge, what with moving house and my daughter in and out of hospital during her pregnancy, but really didn't want to miss this one as well so here is my entry for their challenge of Anything Goes (using at least one Stampsmith image).

My creation was inspired by an old hairdresser who used to always wear a cross body bag to keep her scissors and combs in, so they were to hand while she was cutting etc.  As my daughter qualified as a hairdresser a couple of months ago, I decided to make her a little pouch/bag for the same purpose:


I've made the bag from washed canvas, stamped two images from the Pin Ups sheet (using Archival Ink in Coffee) onto Transfer Artist Paper, and transferred them onto the canvas.  Some SU flourishes were stamped directly onto the canvas, top and bottom, along with the Kanban sentiment (I thought this was quite fitting for a hairdressing bag!).  I've then sewn the lace across the bottom part of the bag, and then sewn the whole thing up.  Some twill tape (stamped with "Fabulous") was sewn across the top of the bag and a wine coloured bow and handmade ribbon rose, with a flower charm handstitched on, were attached with a glue gun.  I've added some SU diamantes with a little fabric glue to finish.  For the purpose of showing the bag in the photos, I've added some twill tape as the strap but need to source some cream webbing to attach instead.

In Action!
I hope you're enjoying your week, and don't forget the the Craft-Room have a current challenge of Pins and/or Charms this fortnight!
Maria xxxxx

Tuesday 21 August 2012

Sweet Memories - Charms and/or Pins for Craft-Room Challenge

Hello, I can't believe how quickly have the last two weeks gone!  Over at the Craft-Room Challenge, your Fashion entries over the last fortnight were stunning - it's so lovely to see your different styles.  It's now time for a new challenge , and this time it's Nikki's turn to choose the theme (please check out her blog to see her fantastic creations).  Nikki would like to see us use:

Charms and/or Pins

I decided to alter/decorate a double wooden arch in some lovely pastel colour acrylic paints which I recently picked up:

The bare arch had two coats of gesso and a light sanding, then was painted (two coats again) of Docrafts acrylic paint in Linen, with a little Adirondack Acrylic Paint Dabber in Shell Pink, with more sanding in between coats for a nice, smooth stamping surface.  I stamped the two images in Coffee Archival Ink, masked them, then stamped the background (TH Papillion) in Archival Ink in Pale Ochre.  Some more acrylics in green & pink were diluted down to make a bit of a translucent wash, then used to colour the images.  When these were dry I applied crackle medium to just parts of the images, and seed beads in copper for the centres of the sunflowers.


Two silver butterfly charms were embossed -  the left one with Aged Ivory embossing enamel and the right one with Shabby Green embossing enamel.  Aged Ivory embossing enamel was also added around the edges of the arches, some lace dyed with distress stain added along the bottom, and a few flowers with little pearls and a couple of hat pins to finish.

The stamps I've used for the two main images are Crafty Individuals CI-188 on the right, and Chapel Road Artstamps (Artishapes) on the left.  

This is quite a colourful piece for me, lol!

Our challenge this fortnight is sponsored by:

(click on the pic to visit their online store - they have the most gorgeous stamps and goodies!)

The rest of the Design Team have made absolutely stunning creations to inspire you - please pop over to the challenge blog and have a look!

Some challenges I would like to enter this into are:

Fashionable Stamping Challenge - Summer Ice Cream Colours (just think Raspberry Ripple and Mint   
                                                    Chocolate Chip, with some sprinkles!)
Creative Inspirations Paint  - Anything But A Card
Moving Along With The Times - Shape Up With Anything But Square
Ruby's Rainbow - Butterflies

Enjoy your week, and I look forward to seeing how you use your charms and pins!
Maria x