Followers

Saturday 31 March 2012

...and there's a winner!

Hi, I'll keep this a really short post as "Take Me Out" is just about to start (I'm addicted to this show)!   Today is the day to draw the winner of my blog candy - thank you for entering, and a big hello to my new followers :-)

I got my other half (Dave) to pick the winning name out so, without further ado, that person is:

Lynne

I decided that I would also send a little something to someone else, so I got my daughter (Hannah) to pick the second name out, and that person is:

Debi

Please email me your address to send your package to!

Maria x

Chunky ATC - LIIU DT Creation

Hi, it's time for another challenge over at Lets Ink It Up.  I loved looking at your flowers during the last challenge - your entries were stunning.  The theme for this challenge is:

Distressing

I decided to have a go at a chunky ATC, and, after a bit of a sand down, this is how it ended up (grab a cuppa, there are 5 sides to this, lol).

I painted it all over with an acrylic paint dabber (a few coats) in Pebble and overstamped with a crackle stamp. All of the CI images, apart from the one on the back, were stamped onto inked Tando inchies and fnished with a Krylon pen and distress stickles. Some fabric twill tape was dyed with Distress Stain in Aged Mahogony (my new favourite colour :-)) and adhered around the bottom.

The front:   I gave it a couple of coats of Shell Pink through a brickwork mask to create a "wall" then another light sand down to rough it up a bit.  Some "grafitti" stamped on the wall with a Snow Cap paint dabber and inked and torn paper added, along with some embellishments.  The wooden dress form has also been painted with an acrylic paint dabber then overstamped with a Darkroom Door Damask background stamp, then covered in Distress Crackle in Rock Candy and finished with a gold Krylon pen.
Front


Left Side
Right Side


The Sides:   These were covered with some scraps of inked dp left over from another project and a CI image added to each side (stamped on Tando inchie) and a little Aged Gold embossing enamel.


The Back:  A CI image was stamped onto a scrap of dp, a piece of mica tile placed over it, then an alcohol inked metal frame added over the top, with some embellishments added.


Back

The Top:  This was covered in tissue tape and inked.  The Grungeboard letters were coloured with Aged Mahogony Distress Stain then covered in Distress Crackle in Rock Candy and a few inked roses added.
Top

On the bottom, I used a wooden cotton reel which I stained then a little Rub n Buff added, and adhered to the base as a stand.

This challenge is sponsored by My Creative Classroom:
One lucky winner will receive a free seat to a class of their choice!

Please pop over to LIIU for more details, and to see the fantastic creations by the rest of the Design Team, and I look forward to visiting your blogs to see your distressed creations.

Some challenges I would like to enter with this:  The Stampman have a Bingo Card theme this month which I would like to enter with the middle vertical line, My Mum's Craft Shop would like us to Use a Rubber Stamp (several on here!), Bunny Zoe's Crafts would like to see Vintage / Shabby Chic, and Diva's By Design would like us to Stamp Something (I stamped images, crackle & dress form background),

Have a great weekend!

Maria x

A Little Anniversary Blog Candy

Hopefully this post will stay at the top of my blog, but please check just below for my most recent post!

My first blog anniversary passed quietly a couple of weeks ago :-), so in keeping with blog tradition, I'd like to offer a little blog candy - it's not a lot, just a few things (see below for details).  The crafting community is such a lovely one and I have made some beautiful friends in blogland, so it's also a little thank you for your lovely comments and inspiration.
There is a mixture of goodies, including a La Blanche rose stamp, a Lost Coast Designs Flower Girl rubber stamp (will require mounting), some 6 x 6 dps by Melissa Frances and Paper Cellar, MM chipboard tags, some lovely pieces of ribbon, a piece of Laura Ashley fabric (never mind about the curtains now, lol), and a couple of other things not pictured...there will also be a little something to alter, but I will wait to see where the parcel is going before I decide.

You don't need to be a follower, but if you like what I make then I'd love you to become one.  If you would like to win this little parcel, all you need to do is leave a comment below to let me know you are interested and I will draw a name on 31 March.  I have 53 followers at this moment in time so, to make it fair, those  names will be entered twice if they comment.

Have a great week.

Maria x

UPDATE:  I have now closed the comments form so that I can do the draw - will post the winner this evening.

Tuesday 27 March 2012

More Friendly Plastic

Hi,  life is a bit hectic at the moment, what with house-hunting and my first grandson on the way - yes, that's right, it's a boy (!!!), so I've not posted, or visited, as much as I'd like however, I would like to share a little something I made with friendly plastic a couple of weeks ago, while I was trying it out for the first time:
I think it does actually look like metal?  The frame is a small mdf collage frame which I have painted with an Adirondrack paint dabber in Juniper, then gone over it with some Paper Artsy Fresco Metallic Glaze, to give it the sparkle factor.  Two different FP pieces were trimmed to fit then cut in half and placed inside the frame in opposite corners...

...and heated until soft.  The joins were then pressed together and and I lightly tapped all over with the handle end of the needle tool to get a hammered finish.  A rose charm was sunk into the centre whilst the FP was still warm and a little Antique Gold Rub 'n' Buff here & there when cold.  I edged the frame in a gold leaf pen but tried to keep it quite simple apart from that.

This stuff is great fun to play with, and it's certainly something I will try again in the future, particularly with the jewellery.  If you fancy trying this out, the currently Craft-Room Challenge is Bling, Glitter & Sparkle and one lucky random winner will receive a jewellery kit containing Friendly Plastic, sponsored by Liz Welch of Rare Bird :-).

Maria x

Tuesday 20 March 2012

Bling & Glitter/Sparkle - Craft-Room DT Creation

Hi, it's time for the next challenge over at the Craft-Room.  The Shabby/Vintage entries were absolutely stunning!  This time it's the lovely Debi's turn to choose the theme of Bling & Glitter/Sparkle - check out Debi's blog to have a look at her beautiful projects and scrapbooking pages.

This month we are sponsored by Liz Welch of:
The prize is one of the wonderful jewellery kits incorporating Friendly Plastic, which Liz is well known for.  
Click on the banner to visit the shop.

As Liz is sponsoring this challenge and offering a jewellery kit as a prize, I decided to take the plunge and have a dabble -  it's something which I have never used before, nor have I made any jewellery.  At a bit of a loss for where to start, I checked out Liz's blog, Rare Lizzie, and also had a look on YouTube for some hints, tips and techniques, and generally some inspiration.  These are what I made:
I purchased the hardware from Rare Bird and used the FP in a couple of different ways:

Rectangular Tray Pendant
For this I used a tray pendant, cut the two pieces of FP to fit and heated them whilst they were in the tray then pressed the seam to fuse them together.  While it was still soft, I used the end of the handle to gently tap down to create a hammered effect (I made a little picture like this as well, which I'll upload later in the week).  I put a coat of resin over the top and cured under a UV lamp for about 20 minutes (I believe the little nail ones work just as good).  I then added the metal flower and another coat of resin.  After the second coat I ended up with a couple of air bubbles at the top so I pierced them and added a third coat which made them invisible.  I love the shimmer of this under the glass like top.
For this one, I used a lacey heart pendant and the oozing technique.  I heated my FP on my craft mat with a heat gun, then when soft I pushed the pendant over the top so that the soft plastic oozed through.  You can then use transfer foils on the back to finish and some cord or leather to thread though. 

Now, I know they're not perfect but I'm pleased with them for a first attempt. I think I like the tray pendant best and intend getting a few more of these and experimenting - this stuff is really good fun, there's no waste as all the little bits can be used up in other projects.  You can even stamp into it (dip your stamp into cold water first to stop it sticking)!

Of course you don't have to use FP in your creation, but we would like to see your Bling & Glitter/Sparkle in other ways, and one lucky person will win a jewellery kit to try this fabulous stuff for themselves.

Have a great week.

Maria x


Saturday 17 March 2012

For Those Special Things

Hi, another Friday night - best night of the week!  I haven't posted much over the last couple of weeks, or visited the blogs as I'd like, so I do apologise.  We're house hunting at the moment and it is taking up soooo much time.  I hope we find something soon.

This little creation has taken me all week, doing just a little each night.  As some of you know, my daughter is pregnant.  Well, she commented last week that next year will be her first Mother's Day, so I decided to make her a little surprise gift for this year.  I've created a few pockets here and there, so she has a special place to keep her scan photographs etc safe.  I've tried to theme it around her becoming a mother and having her own family.  Grab a coffee because there are a few photos!

The front and back covers are made from mountboard and the pages are made of doubled plain Kraft cardstock.  I have mounted printed & embossed Kraft cardstock onto the front and back covers, which has been spritzed with a home made mix of Walnut Ink and perfect pearls.  Tags have been used to show 2 of the 3 pockets in the photos.  Will try and get a good pic of the top pocket between pages 3 & 4 and add it later.
The Front Cover
 
Pages 2 & 3 - a photo can be slipped between p3 & 4, in the top,  for safekeeping

Pages 4 & 5
Pages 6 & 7
The Back Cover
Stamps used are The Stampsmith (from Portrait of a Lady), various Crafty Individuals ones, and Creative Expressions Vintage Sewing.  I've also used Websters Pages & Melissa Frances dps, and a whole mixture of other things, such as various Tim Holtz bits (button, ornate plate, salvage stickers, ticket), trim, flowers, distress ink, distress embossing powder, a button, sewing thread (around the cotton reels), dyed seam binding, and more!  All stamping has been done in Coffee archival ink. 

This is the first time I've made one of these, and I'm really happy with how it's turned out.

There are a few challenges I'd like to enter this into:

The Stampsmith have a theme of "Flip and Fold,  
The Stampman is looking for Vintage creations, and  
The Fashionable Stamping Challenge are playing Bingo (I have the bottom line across, 3rd line down, both diagonals, ).
My Mum's Craft Shop have a theme of Mum's The Word
Bunny Zoe's Crafts - Shabby Chic / Vintage
Creative Card Crew - Vintage

I hope you like it.  Don't forget that Craft-Room Challenge have a Shabby Vintage theme at the moment, and Lets Ink It Up would like to see your flowers.

Have a great weekend!

Maria x

Tuesday 6 March 2012

Shabby Vintage - Craft-Room Challenge DT Project

Hi, it's not only time for another challenge now over at the Craft-Room, it's also time for a few changes as well!  First of all though, I'd just like to say what fabulous and inspiring entries we had into our Colour challenge!  This week, it was the lovely Mervi's turn to choose the theme, and she chose Shabby Vintage -  please check out her blog as it's full of wonderful creations to inspire.

Before I go any further, I just need to let you know about a couple of changes. As you probably know already,  the Craft-Room Online Shop is closing very soon (now 50% off for the last couple of weeks!), therefore will no longer be sponsoring our challenges.  However, we do have some fabulous sponsors lined up for the next 12 months, thanks to our leader Zoe, with this challenge being the first of those (there are a few changes to our rules, so please check out the main blog for full details).  For this challenge, we are sponsored by:
Crafty Individuals!
 
Check out the challenge for full details of the prize!

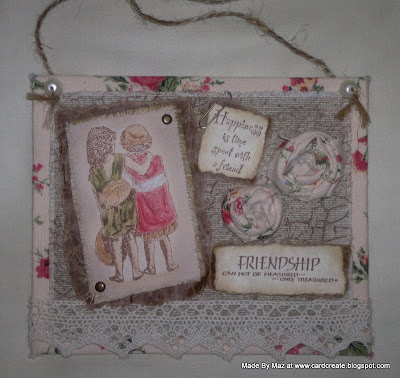
This is my Shabby Vintage creation - in fabric:
I wanted to give this quite a soft look, so I decided use fabric as much as possible throughout.  The floral fabric is by Laura Ashley and was something I purchased from Ebay about three years ago, with the intention of making curtains, however I didn't get round to them and, as we are now looking to move house, I will wait until we're there - I do hope our new house has smaller windows as I've lopped a big piece off the bottom now!  I glued it to a piece of mountboard with fabric glue.  

For the next panel on top, I've used some double sided canvas and sanded the dark side (this softened it up lovely), then stamped a CI crackle background (CI-116) using Archival Ink in Coffee, distressed the edges and and attached using a glue gun: 


For the image panel (I used CI-277 for the image and sentiments), I was tempted to try Paula's technique which she uses for her bags & purses (thank you Paula!), so I primed a small piece of bare canvas with gesso (tinted with acrylic) and stamped the image, again using Coffee Archival Ink.  I then coloured the image using a little ink from inktense blocks picked up with a damp brush,  and dabbed a little Frayed Burlap DI around the edge.  I matted it onto some torn and scrunched Glassine paper and fixed it through the canvas and mountboard with long fasteners:


I've stamped two of the quotes from the same plate as the image, inked the edges, and mounted onto glassine again.  The roses have been made by cutting strips of the same fabric and twisting and rolling, using a glue gun to hold in place, and also to attach. 
Some cream fabric lace trim across the bottom, and twine to hang (yes, it hangs as well!), using two little pearls as stoppers, and it's finished: 
Please head over and check out the gorgeous creations by the rest of the DT, and I hope you will find time to join us!

I'd like to enter my Shabby Vintage creation into the following challenges:

PanPastel - Use A Stamped Image
That Craft Place - Anything Goes
Craft Your Passion - Anything Goes

Have a great week, bye for now

Maria x


Saturday 3 March 2012

Show Us Your Flowers - LIIU DT Creation

Hi, if you saw my last post, you will know that I've recently been invited to join the Design Team over at Let's Ink It Up, which I'm really thrilled about - a big thank you to everyone who left lovely comments, I really appreciate you taking the time to drop by.  The theme for this month is "Show Us Your Flowers", and is sponsored by the lovely Suzanne herself:

 Your flowers can be handmade or shop bought, it's entirely up to you, but we'd love to see what you create. I don't tend to use flowers a lot, so a challenge for me as well!

Here is my creation - a little box to pop some Thorntons chocolates in for my mum on Mothers' Day:
A little wooden box has had 3 coats of chalk emulsion in Sung Blue (although it is actually a green colour), with a sanding between each coat and I've then sealed it with wood balsam.  I've added a TH bookplate with a "Love" ticket underneath and added some little flowers around the top.   The large yellow flower has been made with 6 tattered florals, die cut from yellow cotton, folded twice then attached in a circle with a brad through the middle.  I've stamped a SU design 3 times onto some Melissa Frances dp then cut out with an oval punch, distressed the edges slightly, and attached to the front and sides.
For the inside, I've lined the box with the same Melissa Frances dp and stamped a PaperArtsy sentiment (which I've split into two sections) directly onto the dp, then mounted onto some sanded Core'dinations paper.  I've attached a few lemon & cream roses to the top and bottom of the inside of the box, to tie in with the sentiment, to finish.  All I need now are the chocolates to go inside!

If you need some inspiration, please pop over and see the fabulous creations by the rest of the Design Team, and take a look at this month's prize:

Such stunning flowers.  I hope you can join in with the challenge, and I look forward to seeing your creations.  Good luck!

There are a few challenges that I'd like to enter my little gift box into:

Tando Creative Challenge - Spring Is In The Air
Cupcake Craftroom - Spring Bouquet
Joanna Sheen Challenge - Spring/Easter
Crafty Ribbons Challenge - Celebrate Your Mum (the box is for Mother's Day)
Anything Goes Challenge - Altered Projects

Have a great weekend!

Maria x